
Arduino සමඟ 2-Channel Relay Module එක භාවිතා කරන හැටි
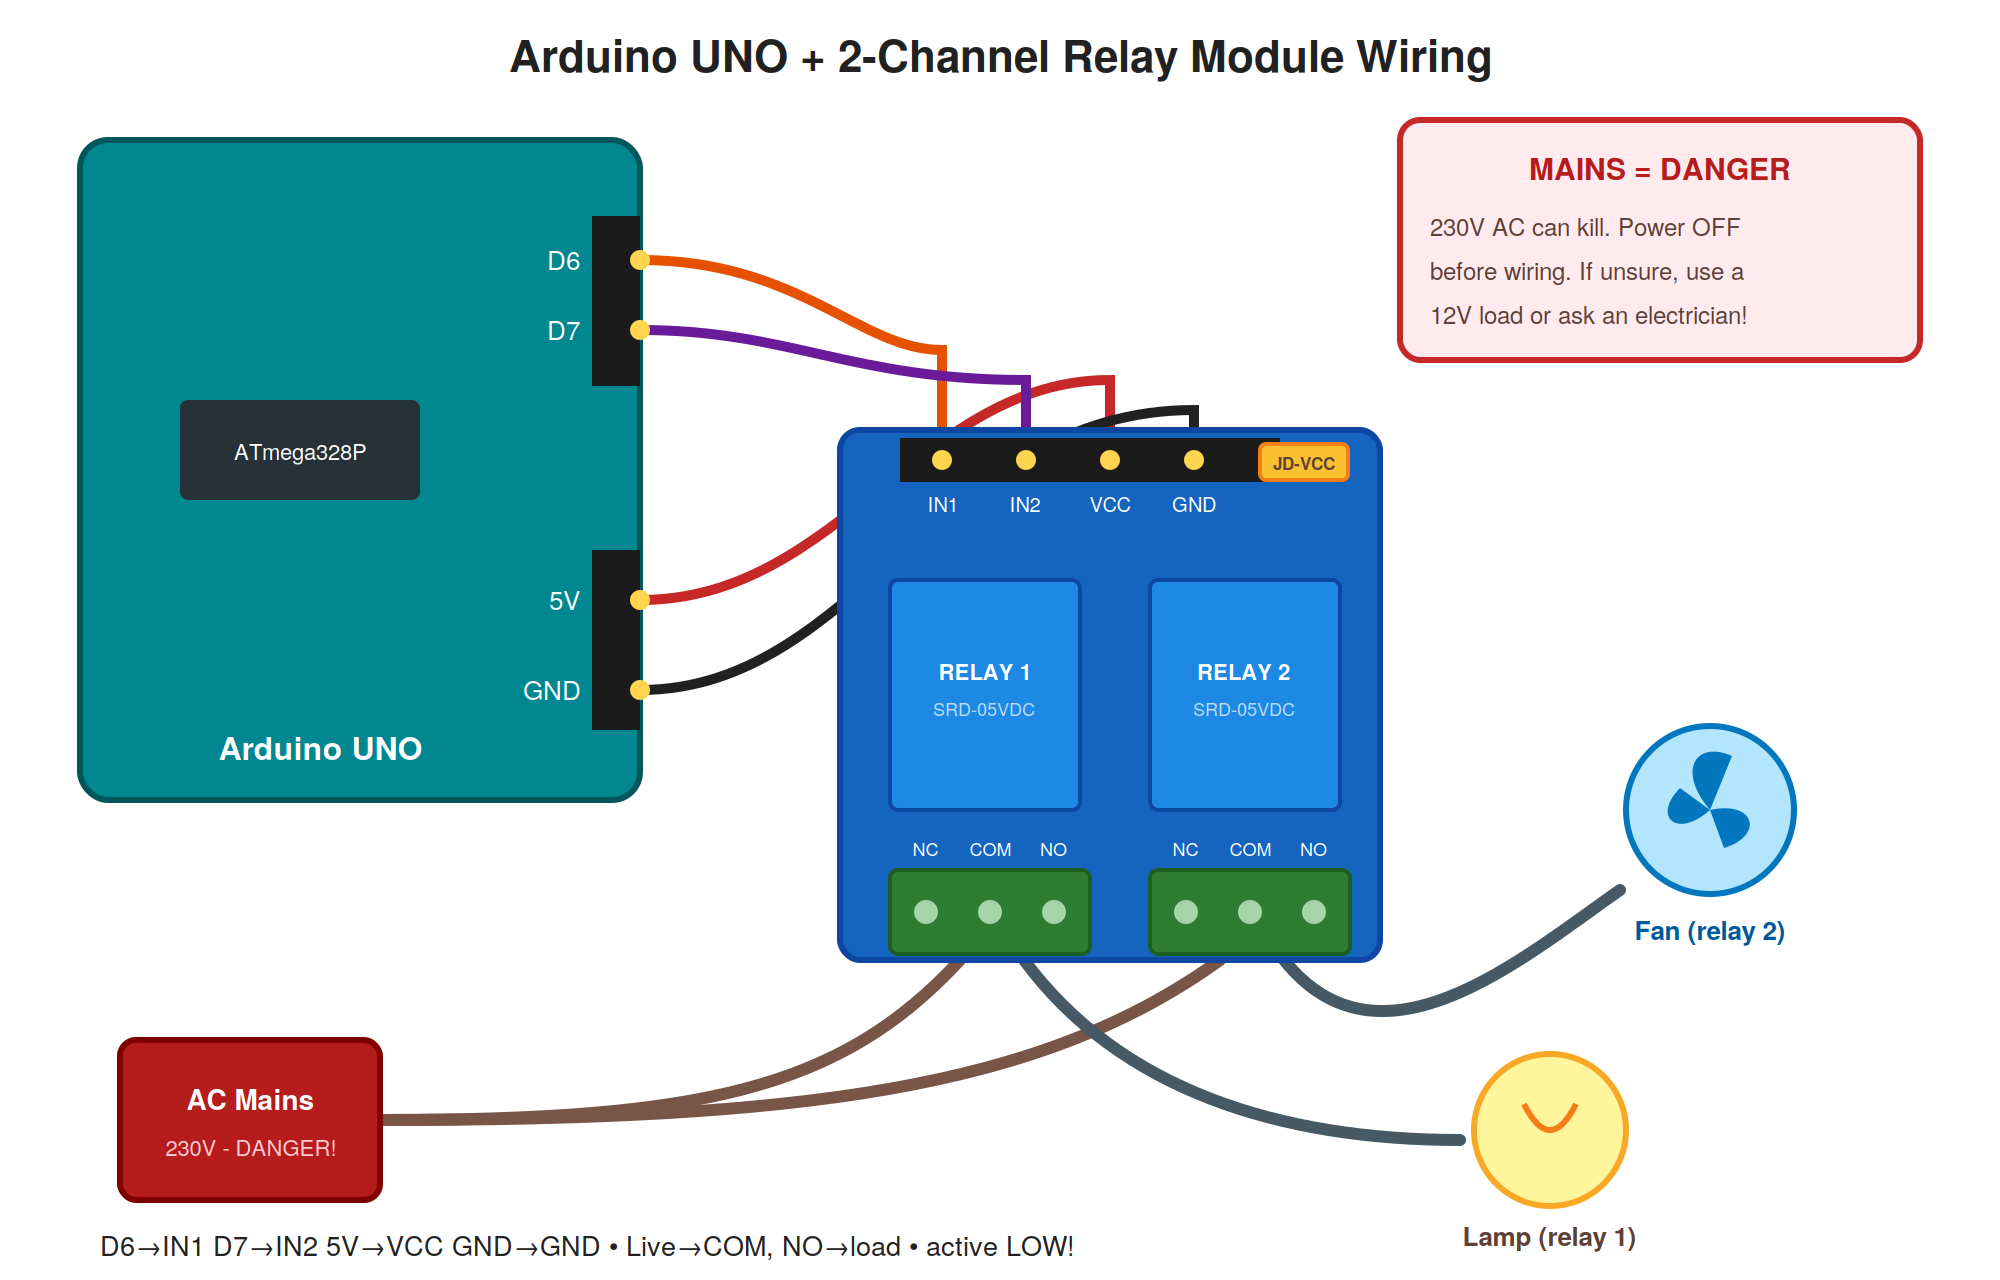
සම්පූර්ණ Tutorial එක — Wiring, Diagrams, Code Examples සමඟ Sinhala + English Technical Terms ⚠ අනතුරු ඇඟවීමයි: මේ project එකේ mains (230V AC) විදුලිය සම්බන්ධයි. වැරදුණොත් බරපතළ තුවාල / ජීවිත හානි වෙන්න පුළුවන්. High-voltage AC ගැන අත්දැකීම් නැත්නම් 12V DC load එකකින් practice කරන්න, නැත්නම් electrician කෙනෙක්ගේ උදව් ගන්න. Wiring කරන හැම වෙලාවෙම mains power එක OFF!
1. හැඳින්වීම (Introduction)
Arduino එකෙන් LED එකක් පත්තු කරන්න පුළුවන් — ඒත් බල්බයක්, fan එකක්, pump එකක් වගේ mains (230V) device එකක්? Arduino pin එකකින් එන 5V/40mA එකෙන් ඒවා කොහොමවත් බැහැ. ඒ වැඩේට තමයි relay එක: පොඩි signal එකකින් ලොකු circuit එකක් switch කරන electrically-isolated switch එකක්.
2-channel module එකේ relays දෙකක් — devices දෙකක් වෙන වෙනම control කරන්න පුළුවන්. Home automation වල පදනම මේකයි!
මේ tutorial එකේදී අපි ඉගෙන ගන්නේ:
- Relay module එකේ pinout + COM/NO/NC terminals
- Active LOW logic එක — HIGH = OFF, LOW = ON!
- Optocoupler isolation + JD-VCC jumper එක
- Wiring + code — devices දෙකක් schedule එකකට switch කරමු
2. Module එක
2.1 Output Terminals — COM / NO / NC
- COM — Common: load circuit එකේ එක කෙළවර (live wire එක) මෙතනට.
- NO (Normally Open) — Relay OFF වෙලාවට COM එකෙන් වෙන් වෙලා. Relay ON වුණාම connect. "Device එක normally OFF, ඕන වෙලාවට ON" — ගොඩක් වැඩවලට මේකයි.
- NC (Normally Closed) — Relay OFF වෙලාවට COM එකට connect. Relay ON වුණාම disconnect. "Normally ON, ඕන වෙලාවට OFF" cases වලට.
2.2 JD-VCC Jumper එක — Full Isolation
Module එකේ optocouplers නිසා Arduino පැත්තයි relay coil පැත්තයි electrically වෙන් කරන්න පුළුවන්. JD-VCC jumper එක තියෙද්දී දෙකම Arduino 5V එකෙන්. Jumper එක අයින් කරලා JD-VCC + GND වලට වෙනම 5V supply එකක් දුන්නොත් Arduino එක relay coils වල noise/spikes වලින් 100% isolate වෙනවා — sensitive projects වලට recommended.
3. Wiring එක
4. Code එක
const int relay1 = 6;
const int relay2 = 7;
void setup() {
  pinMode(relay1, OUTPUT);
  pinMode(relay2, OUTPUT);
  // Active LOW! HIGH = relay OFF - මුලින්ම දෙකම OFF
  digitalWrite(relay1, HIGH);
  digitalWrite(relay2, HIGH);
}
void loop() {
  digitalWrite(relay1, LOW);   // Relay 1 ON (lamp)
  delay(3000);
  digitalWrite(relay1, HIGH);  // Relay 1 OFF
  digitalWrite(relay2, LOW);   // Relay 2 ON (fan)
  delay(3000);
  digitalWrite(relay2, HIGH);  // Relay 2 OFF
  delay(1000);
}- Active LOW logic එක — LOW = ON, HIGH = OFF. setup() එකේ මුලින්ම HIGH ලියලා relays OFF state එකෙන් පටන්ගන්න — නැත්නම් boot වෙද්දී loads ON වෙනවා!
- pinMode කලින් digitalWrite — වඩාත් safe: pinMode(relay1, OUTPUT) කලින් digitalWrite(relay1, HIGH) කරලා glitch එක අවම කරන්නත් පුළුවන්.
5. වැදගත් Tips
- Mains safety — Insulated enclosure එකක relay module එක mount කරන්න, screw terminals හොඳට තද කරන්න, bare wires නැති වෙන්න. Wiring වෙනස් කරද්දී හැමවිටම power OFF.
- Relay ON වුණාම Arduino reset — Coils 140mA ගන්නවා — USB power මදි වෙන්න පුළුවන්. External 5V supply / JD-VCC separate supply setup එක.
- Inductive loads (motor, fan) — Switch වෙද්දී spark/noise වැඩියි. Contact rating එකෙන් 50%ක ම margin එකක් තියන්න, AC වලට snubber circuit එකක් හොඳයි.
- 10A limit එක — Heater, AC unit වගේ ලොකු loads relay module එකට බැහැ — contactor එකක් ඕන.
- Test with 12V first — Logic එක test කරන්න 12V bulb/LED strip එකකින් පටන්ගන්න — safe!
6. Project Ideas
- Temperature-Controlled Fan — DHT11/DS18B20 tutorial + relay — උණුසුම වැඩි වුණාම fan ON.
- Scheduled Lights — DS3231 RTC tutorial එක — වෙලාවට lights ON/OFF.
- SMS Switch — SIM800L tutorial එක — SMS එකකින් ගෙදර device control!
- Clap Switch — Sound sensor tutorial එක (මේ series එකේම!) — අත්පුඩි දෙකකින් light ON/OFF.
7. සාරාංශය (Summary)
Relay module එක Arduino ලෝකෙයි high-power ලෝකෙයි අතරේ bridge එක. මතක තියාගන්න ඕන ප්රධාන කරුණු: active LOW (LOW = ON), COM + NO combo එක normally-off loads වලට, setup() එකේ මුලින්ම HIGH කරලා relays OFF කරන්න, JD-VCC jumper අයින් කරලා full isolation, coils වලට USB power මදි වෙන්න පුළුවන්, 10A contact limit, සහ mains safety rules කවදාවත් break කරන්න එපා. Home automation journey එක මෙතනින් පටන්!
Reference / මූලාශ්රය:
මේ tutorial එක ලියුවේ පහත මූලාශ්රයේ තොරතුරු පදනම් කරගෙන (රූප සටහන් සහ code examples අලුතින්ම හදපු ඒවා): Last Minute Engineers — 2-Channel Relay Module with Arduino