
Arduino සමඟ MicroSD Card Module එක භාවිතා කරන හැටි
සම්පූර්ණ Tutorial එක — Wiring, Diagrams, Code Examples සමඟ Sinhala + English Technical Terms
1. හැඳින්වීම (Introduction)
Arduino project එකක් කරනකොට ගොඩක් වෙලාවට data save කරන්න අවශ්ය වෙනවා — උදාහරණයක් විදිහට sensor readings ටිකක් පැය ගණනක් log කරන්න, settings save කරන්න, නැත්නම් file එකකින් data කියවන්න. නමුත් Arduino UNO එකේ තියෙන memory එක හරිම සීමිතයි: SRAM එක 2KB යි, EEPROM එක 1KB යි විතරයි. ඒ නිසා ලොකු data ප්රමාණයක් store කරන්න වෙනම storage එකක් ඕන වෙනවා.
මේකට ලේසිම සහ ලාබම විසඳුම තමයි MicroSD Card Module එක. මේ පොඩි module එකෙන් ඔයාට microSD memory card එකක් Arduino එකට connect කරලා GB ගණනින් data කියවන්න/ලියන්න පුළුවන්. Data logger, weather station, settings storage, audio player වගේ projects වලට මේක අත්යවශ්ය component එකක්.
මේ tutorial එකේදී අපි ඉගෙන ගන්නේ:
- MicroSD card module එකේ hardware එක වැඩ කරන හැටි
- Module එක Arduino UNO එකට wire කරන හැටි (diagram සමඟ)
- SD card එක format කරලා test කරන හැටි
- File එකකට data ලියන සහ කියවන හැටි (code examples සමඟ)
- SD library එකේ වැදගත් functions ඔක්කොම
2. MicroSD Card Module Hardware එක
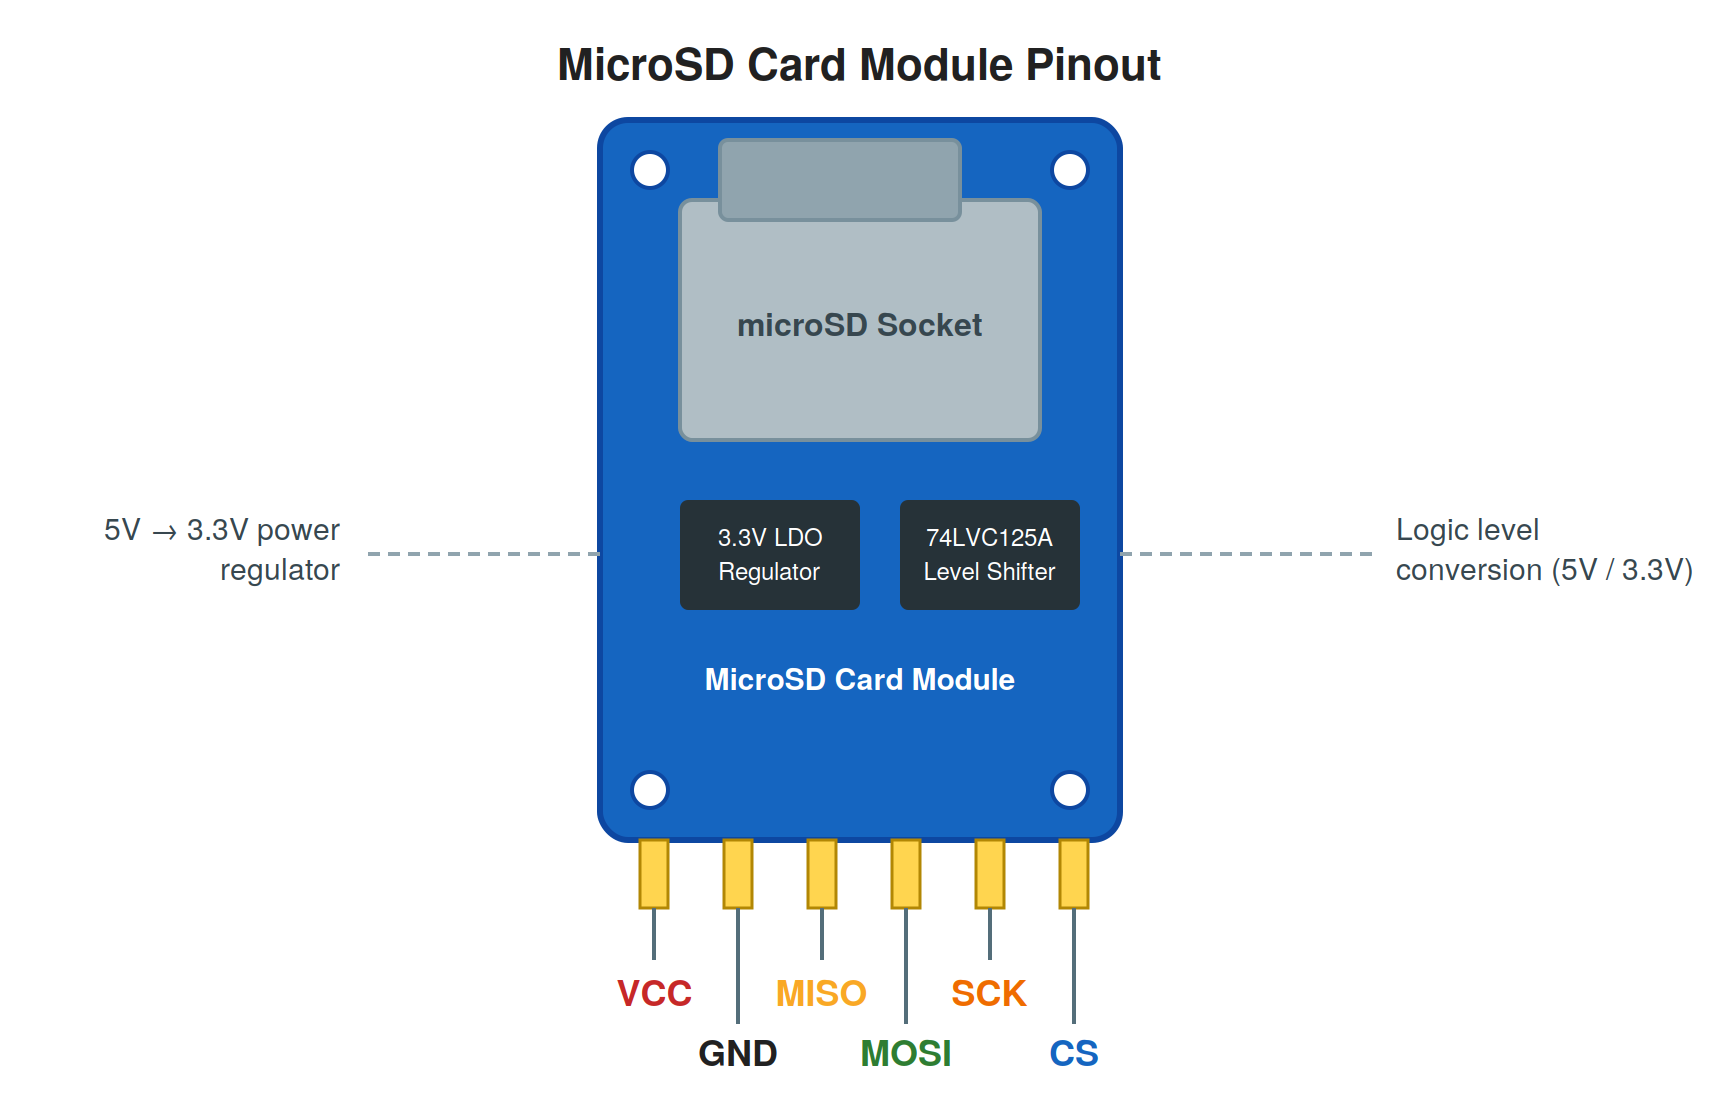
MicroSD card module එක හරිම simple board එකක්. ඒකේ ප්රධාන කොටස් තුනක් තියෙනවා: microSD card socket එක, 3.3V voltage regulator එක, සහ logic level shifter chip එක.
2.1 Voltage — 3.3V vs 5V (වැදගත්!)
MicroSD cards වැඩ කරන්නේ 3.3V වලින්. Card එකකට 3.6V ට වඩා වැඩි voltage එකක් දුන්නොත් card එක permanently damage වෙනවා. නමුත් Arduino UNO එක වැඩ කරන්නේ 5V logic වලින්. එතකොට කොහොමද මේ දෙක connect කරන්නේ?
Module එක මේ ප්රශ්නය විසඳන්නේ මෙහෙමයි:
- 3.3V LDO Voltage Regulator — Arduino එකේ 5V pin එකෙන් එන power එක 3.3V ට අඩු කරලා card එකට දෙනවා. ඒ නිසා module එකේ VCC pin එකට කෙලින්ම 5V දෙන්න පුළුවන්.
- 74LVC125A Level Shifter Chip — Arduino එකෙන් එන 5V logic signals (MOSI, SCK, CS) 3.3V ට convert කරනවා. ඒ නිසා card එකේ data pins වලට කිසිම හානියක් වෙන්නේ නැහැ.
මේ chips දෙක නිසා තමයි මේ module එක 5V Arduino boards (UNO, Nano, Mega) එක්ක safe විදිහට use කරන්න පුළුවන් වෙන්නේ.
2.2 SPI Interface එක
SD cards වලට communicate කරන්න methods දෙකක් තියෙනවා: SDIO mode එක සහ SPI mode එක. SDIO වේගවත් වුණාට complex වැඩියි — ඒක use වෙන්නේ mobile phones, cameras වගේ devices වල. SPI (Serial Peripheral Interface) ටිකක් slow වුණාට හරිම simple නිසා, Arduino වගේ ඕනෑම microcontroller එකකට ලේසියෙන්ම implement කරන්න පුළුවන්. ඒ නිසා hobby projects වලට use වෙන්නේ SPI mode එක.
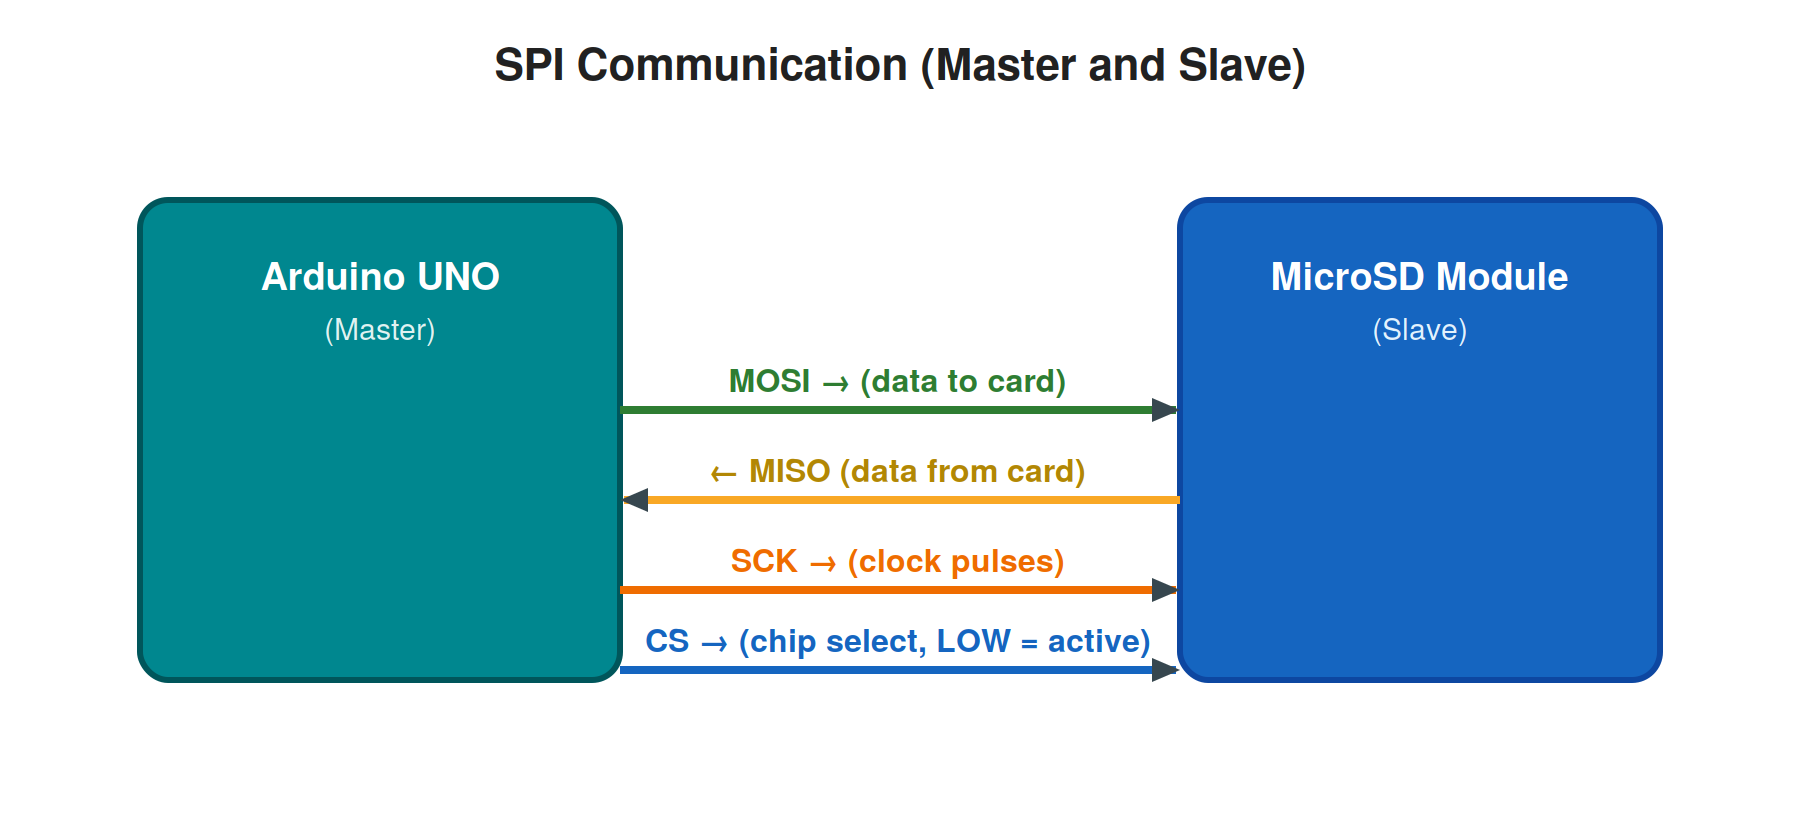
SPI communication එකේදී Arduino එක Master විදිහටත්, SD module එක Slave විදිහටත් වැඩ කරනවා. Signals හතරක් use වෙනවා:
- MOSI (Master Out Slave In) — Arduino එකෙන් card එකට data යවන line එක
- MISO (Master In Slave Out) — Card එකෙන් Arduino එකට data එන line එක
- SCK (Serial Clock) — Data synchronize කරන clock pulses ටික Arduino එකෙන් generate කරනවා
- CS (Chip Select) — මේ pin එක LOW කළාම module එක active වෙනවා. SPI bus එකේ devices කීපයක් තිබ්බත්, CS pin එකෙන් තමයි කාට කතා කරනවද කියලා තෝරන්නේ.
3. Module Pinout එක
සාමාන්ය microSD card module එකක pins 6ක් තියෙනවා:
4. SD Card එක Format කිරීම
Arduino SD library එක වැඩ කරන්නේ FAT16 හෝ FAT32 file systems වලින් format කරපු cards එක්ක විතරයි. ඒ නිසා card එක use කරන්න කලින් format කරන එක ගොඩක් වැදගත්:
- අලුත් card එකක් වුණත් factory format එක හරියටම FAT32 නොවෙන්න පුළුවන් — ඒ නිසා format කරලාම පටන් ගන්න එක safe.
- කලින් camera එකක, phone එකක use කරපු card එකක් නම් අනිවාර්යයෙන්ම format කරන්න.
- Format කරන්න හොඳම tool එක SD Association එකේ නිල "SD Memory Card Formatter" utility එක (sdcard.org site එකෙන් free download කරන්න පුළුවන්). Windows built-in format tool එකටත් පුළුවන් — FAT32 select කරන්න.
Format කරනකොට card එකේ තියෙන ඔක්කොම data මැකෙනවා කියන එක මතක තියාගන්න!
5. Arduino UNO එකට Wire කිරීම
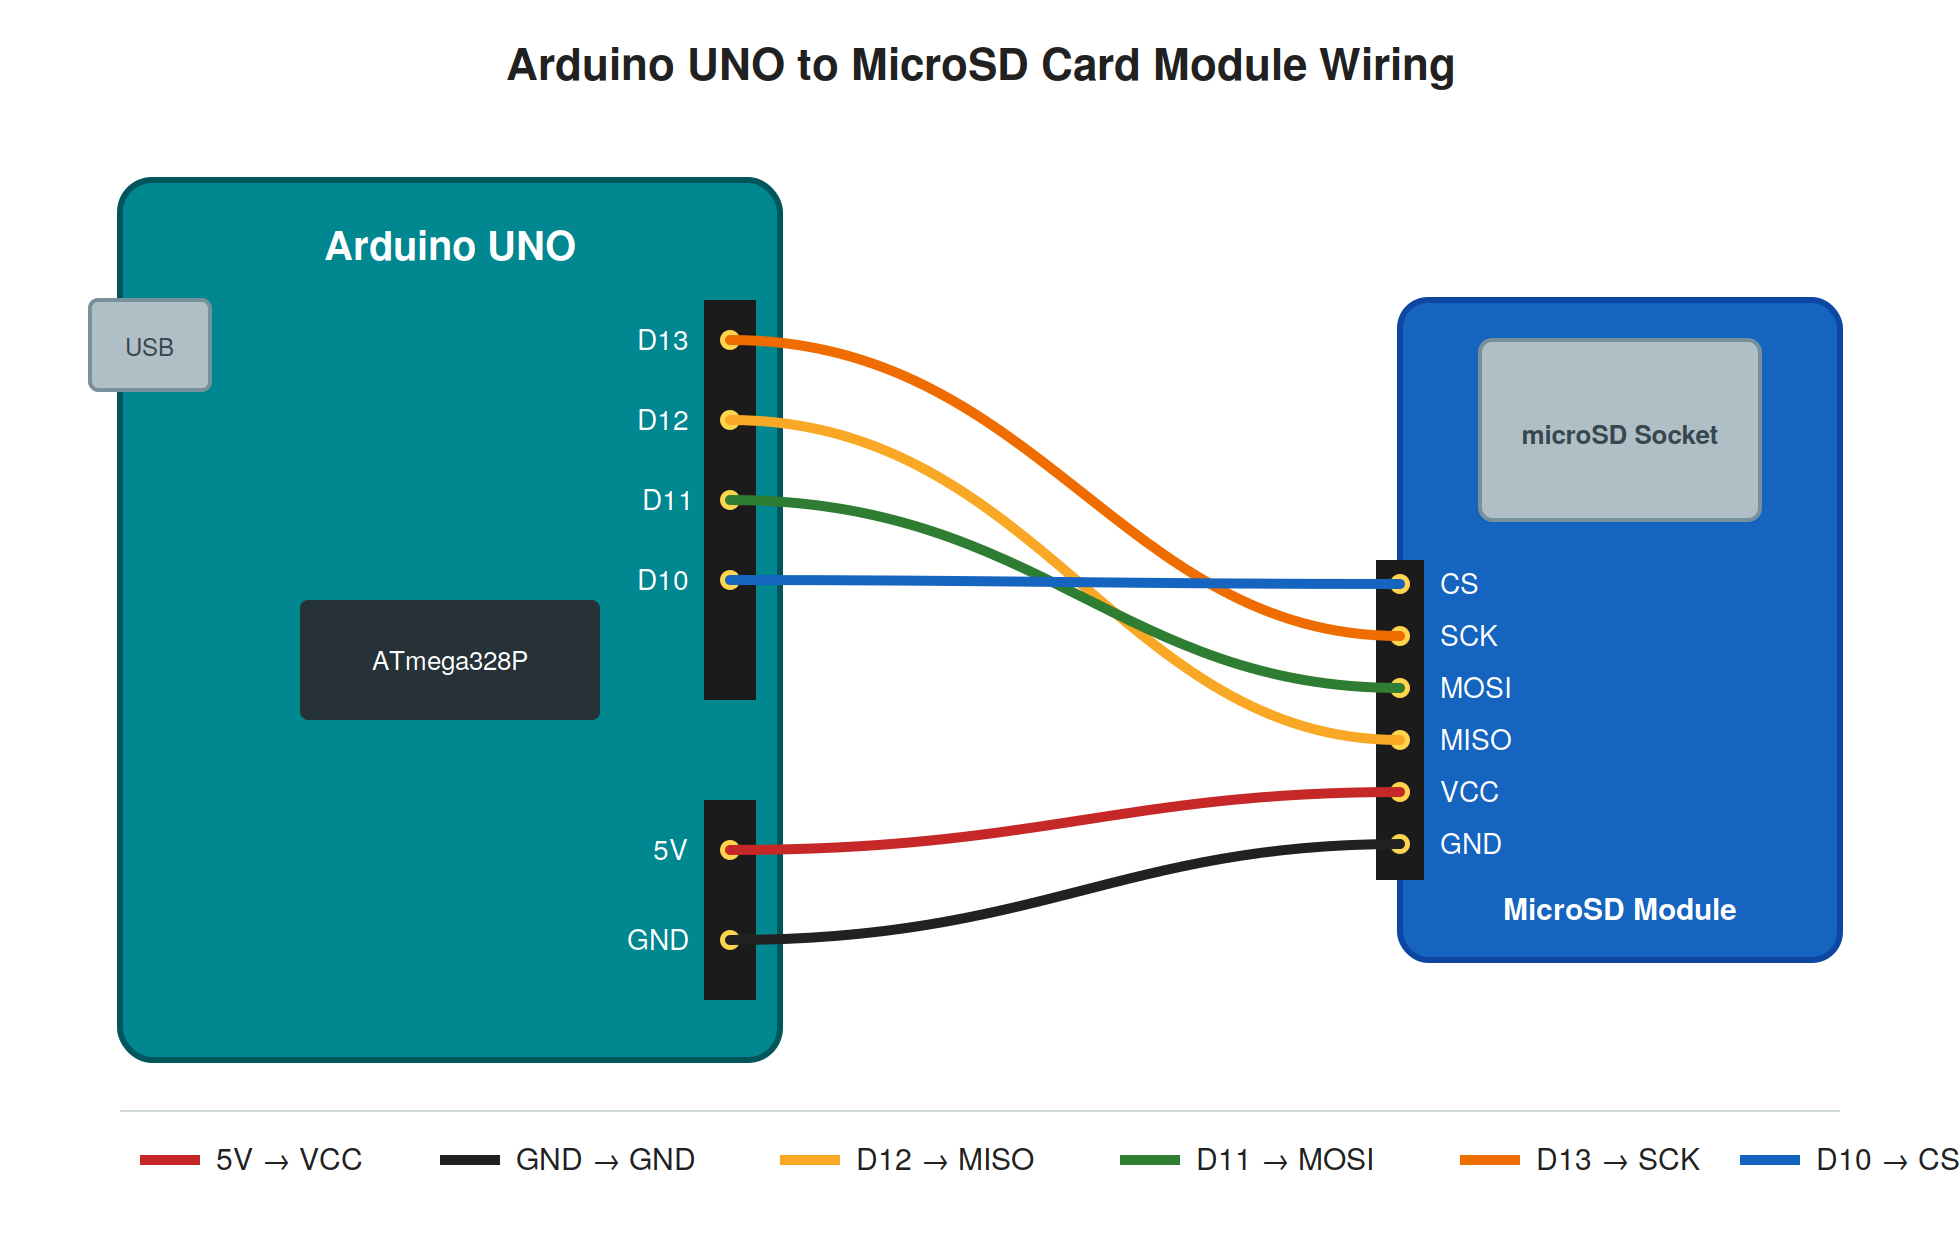
දැන් module එක Arduino UNO එකට connect කරමු. SPI pins ටික Arduino UNO එකේ fix වෙලා තියෙන නිසා MISO, MOSI, SCK pins මාරු කරන්න බැහැ. CS pin එක විතරක් ඕනෑම digital pin එකකට දාන්න පුළුවන් — අපි default විදිහට pin 10 use කරමු.
වෙනත් Arduino boards වල SPI pins වෙනස්:
6. පළමු Test එක — CardInfo Sketch එක
Wiring එක හරිද, card එක වැඩද කියලා බලන්න ලේසිම විදිහ Arduino IDE එකේම එන CardInfo example sketch එක run කරන එක. මේක SD card එක initialize කරලා card එකේ details ටික Serial Monitor එකේ පෙන්නනවා.
Arduino IDE එකේ File > Examples > SD > CardInfo කියන path එකෙන් sketch එක open කරන්න.
Sketch එකේ chipSelect variable එක අපේ wiring එකට ගැලපෙන්න 10 කියලා set කරලා තියෙනවද බලන්න:
const int chipSelect = 10;Sketch එක upload කරලා Serial Monitor එක open කරන්න (baud rate එක 9600 ට set කරන්න).
6.1 Output එක තේරුම් ගනිමු
- හරියට වැඩ කළොත් — card type එක (SD1/SD2/SDHC), file system එක (FAT16/FAT32), card size එක වගේ details පෙන්නනවා.
- "initialization failed" ආවොත් — wiring එක නැවත check කරන්න (විශේෂයෙන්ම MISO/MOSI මාරු වෙලාද කියලා), card එක හරියට socket එකේ insert වෙලාද බලන්න, chipSelect pin එක code එකේ එකට සමානද බලන්න.
- Details වැරදි/හිස් විදිහට පෙන්නුවොත් — card එක corrupt වෙලා වෙන්න පුළුවන්. SD Formatter tool එකෙන් format කරලා ආයෙ try කරන්න.
7. SD Card එකට ලිවීම සහ කියවීම (Read/Write)
දැන් අපි අපේම sketch එකක් ලියමු. මේ example එක test.txt කියලා file එකක් හදලා, ඒකට lines දෙකක් ලියලා, ආපහු ඒ file එක කියවලා Serial Monitor එකේ පෙන්නනවා:
#include <SPI.h>
#include <SD.h>
const int chipSelect = 10;
File myFile;
void setup() {
  Serial.begin(9600);
  while (!Serial); // Serial port එක ready වෙනකම්
  Serial.print("SD card initializing...");
  if (!SD.begin(chipSelect)) {
    Serial.println(" failed!");
    while (1); // මෙතනින් නවතිනවා
  }
  Serial.println(" done.");
  // ----- File එකට ලියමු -----
  myFile = SD.open("test.txt", FILE_WRITE);
  if (myFile) {
    Serial.print("Writing to test.txt...");
    myFile.println("Hello from Arduino!");
    myFile.println("Temperature: 27.5 C");
    myFile.close(); // close() අනිවාර්යයි!
    Serial.println(" done.");
  } else {
    Serial.println("Error opening test.txt!");
  }
  // ----- File එක කියවමු -----
  myFile = SD.open("test.txt"); // read mode (default)
  if (myFile) {
    Serial.println("test.txt contents:");
    while (myFile.available()) {
      Serial.write(myFile.read()); // character එකින් එක
    }
    myFile.close();
  } else {
    Serial.println("Error opening test.txt!");
  }
}
void loop() {
  // මෙතන කිසි දෙයක් නැහැ
}
7.1 Code එක තේරුම් ගනිමු
SD.begin(chipSelect) — SD library එක initialize කරනවා. Card එක හම්බුනේ නැත්නම් false return කරනවා.
SD.open("test.txt", FILE_WRITE) — file එක write mode එකෙන් open කරනවා. File එක නැත්නම් අලුතින් හැදෙනවා. FILE_WRITE mode එකේදී cursor එක file එකේ අන්තිමට යනවා — ඒ කියන්නේ ආයෙ ආයෙ run කළොත් අලුත් data පරණ data වලට පස්සෙන් append වෙනවා.
myFile.println(...) — Serial.println වගේම file එකට text ලියනවා. print(), write() functions වලටත් පුළුවන්.
myFile.close() — හරිම වැදගත්! Data ටික card එකට actually save වෙන්නේ close() call කළාම. මේක අමතක වුණොත් data නැති වෙන්න පුළුවන්.
myFile.available() — කියවන්න ඉතුරු bytes ගාන return කරනවා. read() function එක එක character එකක් බැගින් කියවනවා, ඒ නිසා while loop එකකින් සම්පූර්ණ file එකම කියවනවා.
7.2 Serial Monitor Output එක
SD card initializing... done.
Writing to test.txt... done.
test.txt contents:
Hello from Arduino!
Temperature: 27.5 C
7.3 Bonus — Simple Data Logger එකක්
Sensor එකක readings ටික තප්පරයකට සැරයක් log කරන්න ඕන නම්, loop() function එක මෙහෙම ලියන්න පුළුවන්:
void loop() {
  File logFile = SD.open("log.txt", FILE_WRITE);
  if (logFile) {
    logFile.print(millis());       // වෙලාව (ms)
    logFile.print(",");
    logFile.println(analogRead(A0)); // sensor value එක
    logFile.close();
  }
  delay(1000); // තප්පරයක් ඉන්නවා
}
මේකෙන් හැදෙන log.txt file එක CSV format එකේ නිසා Excel වලින් කෙලින්ම open කරලා chart එකක් හදන්නත් පුළුවන්.
8. SD Library — වැදගත් Functions
SD library එකේ objects දෙකක් තියෙනවා: SD object එක (card/file system operations වලට) සහ File object එක (open කරපු file එකක් එක්ක වැඩ කරන්න).
8.1 SD Object Functions
8.2 File Object Functions
9. වැදගත් Tips සහ සීමා (Limitations)
- 8.3 Filename Limit — File names වලට උපරිම characters 8 යි + extension එකට 3 යි. DATALOG1.TXT හරි, my_long_filename.text වැරදියි. Names case-insensitive — TEST.TXT සහ test.txt එකම file එක.
- එකවර එක file එකයි — Standard SD library එකෙන් එකවර open කරලා තියාගන්න පුළුවන් එක file එකක් විතරයි. දෙවෙනි එකක් open කරන්න කලින් පළවෙනි එක close කරන්න.
- close() අමතක කරන්න එපා — Data ටික card එකට ලියවෙන්නේ close() (හෝ flush()) call කළාම. Power off වුණොත් unclosed file එකක data නැති වෙනවා.
- FILE_WRITE = append — FILE_WRITE mode එකෙන් open කළාම අලුත් data එකතු වෙන්නේ file එකේ අන්තිමට. මුල ඉඳන්ම අලුතින් ලියන්න ඕන නම් ඉස්සෙල්ලා SD.remove("file.txt") කරලා ආයෙ open කරන්න.
- CS pin එක වෙනස් කරන්න පුළුවන් — CS එක ඕනෑම digital pin එකකට දාලා SD.begin(pin) එකේ ඒ pin number එක දෙන්න. නමුත් hardware SS pin එක (UNO: 10) OUTPUT විදිහට තියෙන්න ඕන — නැත්නම් library එක වැඩ කරන්නේ නැහැ.
- File paths — Folders ඇතුළේ files access කරන්න "/folder/file.txt" වගේ path එකක් දෙන්න පුළුවන්.
- 3.3V boards — ESP32, ESP8266 වගේ 3.3V board එකක් නම් module එකේ VCC එකට 5V ම දෙන්න (LDO regulator එකට input margin එකක් ඕන නිසා). Board එකේ logic 3.3V නිසා level shifter එක ප්රශ්නයක් නැහැ.
10. සාරාංශය (Summary)
MicroSD card module එක Arduino projects වලට cheap, reliable storage විසඳුමක්. මතක තියාගන්න ඕන ප්රධාන කරුණු: module එක SPI වලින් communicate කරනවා (UNO: pins 10-13), card එක FAT16/FAT32 වලින් format වෙලා තියෙන්න ඕන, file names 8.3 format එකේ වෙන්න ඕන, සහ ලියපු data save වෙන්න close() කරන්නම ඕන. දැන් ඔයාට data logger එකක්, settings storage එකක් වගේ ඕනම project එකක් හදන්න පුළුවන්!