
Arduino සමඟ PIR Motion Sensor (HC-SR501) එක භාවිතා කරන හැටි
සම්පූර්ණ Tutorial එක — Wiring, Diagrams, Code Examples සමඟ Sinhala + English Technical Terms
1. හැඳින්වීම (Introduction)
කවුරුහරි කාමරයකට ආවම light එකක් ON වෙන, නැත්නම් alarm එකක් නාද වෙන project එකක් හදන්න ඕන නම්, ඔයාට අවශ්ය වෙන්නේ motion sensor එකක්. Hobby electronics වල මේකට වැඩිපුරම use වෙන sensor එක තමයි PIR Motion Sensor එක — විශේෂයෙන්ම HC-SR501 module එක. මේක ලාබයි (රුපියල් කීපසීයයි), power ගන්නේ හරිම අඩුවෙන්, ඒ වගේම use කරන්නත් හරිම ලේසියි.
PIR කියන්නේ "Passive Infrared" කියන එකට. "Passive" කියලා කියන්නේ මේ sensor එක කිසිම දෙයක් emit කරන්නේ නැති නිසා — ඒක කරන්නේ අවට පරිසරයෙන් එන infrared (IR) radiation එක බලාගෙන ඉන්න එක විතරයි. මිනිස්සු, සතුන් වගේ උණුසුම් සිරුරු වලින් IR radiation නිකුත් වෙනවා. ඒ radiation pattern එක හදිසියේ වෙනස් වුණාම — ඒ කියන්නේ කවුරුහරි sensor එක ඉස්සරහින් move වුණාම — sensor එක ඒක අඳුනගෙන output pin එක HIGH කරනවා.
මේ tutorial එකේදී අපි ඉගෙන ගන්නේ:
- PIR sensor එකක් motion detect කරන විදිහ (pyroelectric sensor + Fresnel lens)
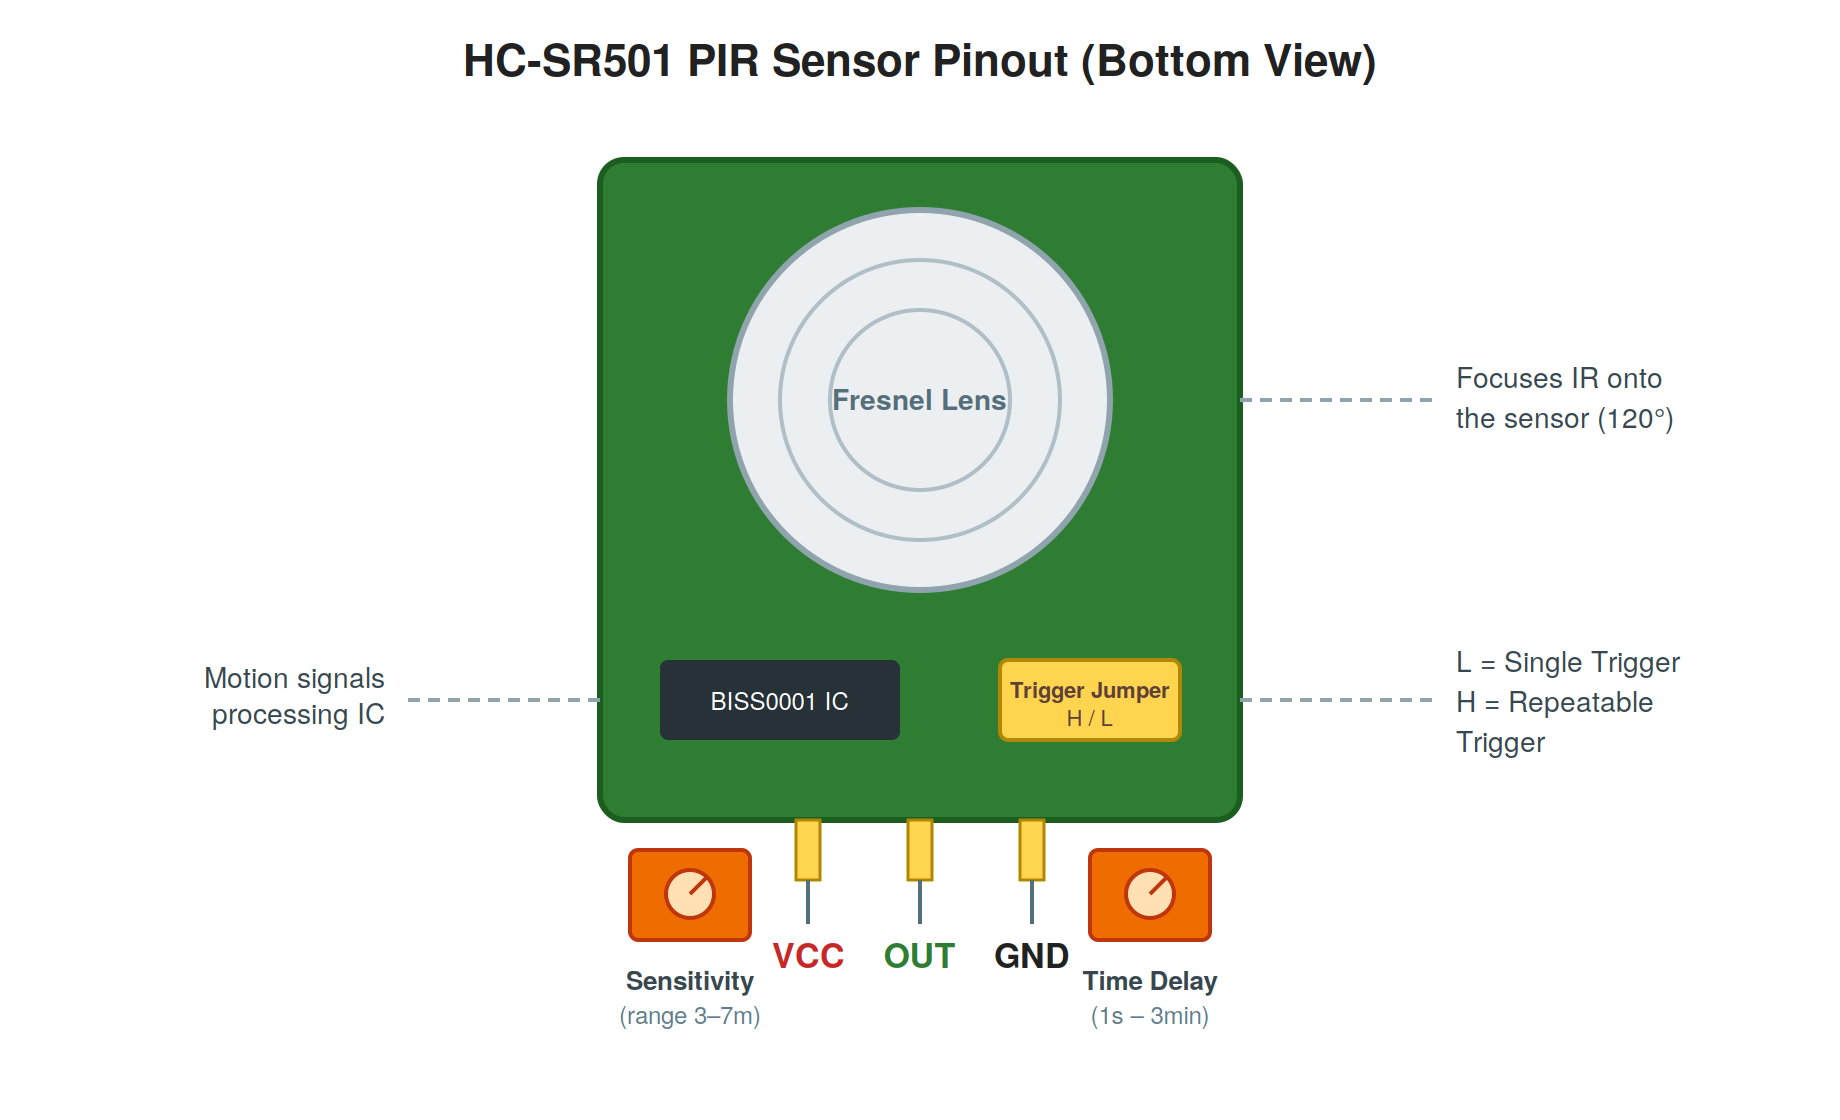
- HC-SR501 එකේ pinout එක, potentiometers දෙක සහ trigger jumper එක
- Arduino UNO එකට wire කරන හැටි (diagram සමඟ)
- Motion detect කරලා LED එකක් දාන code example එකක්
- Warm-up time, trigger modes වගේ වැදගත් practical tips
2. PIR Sensor එක වැඩ කරන හැටි
2.1 Pyroelectric Sensor එක
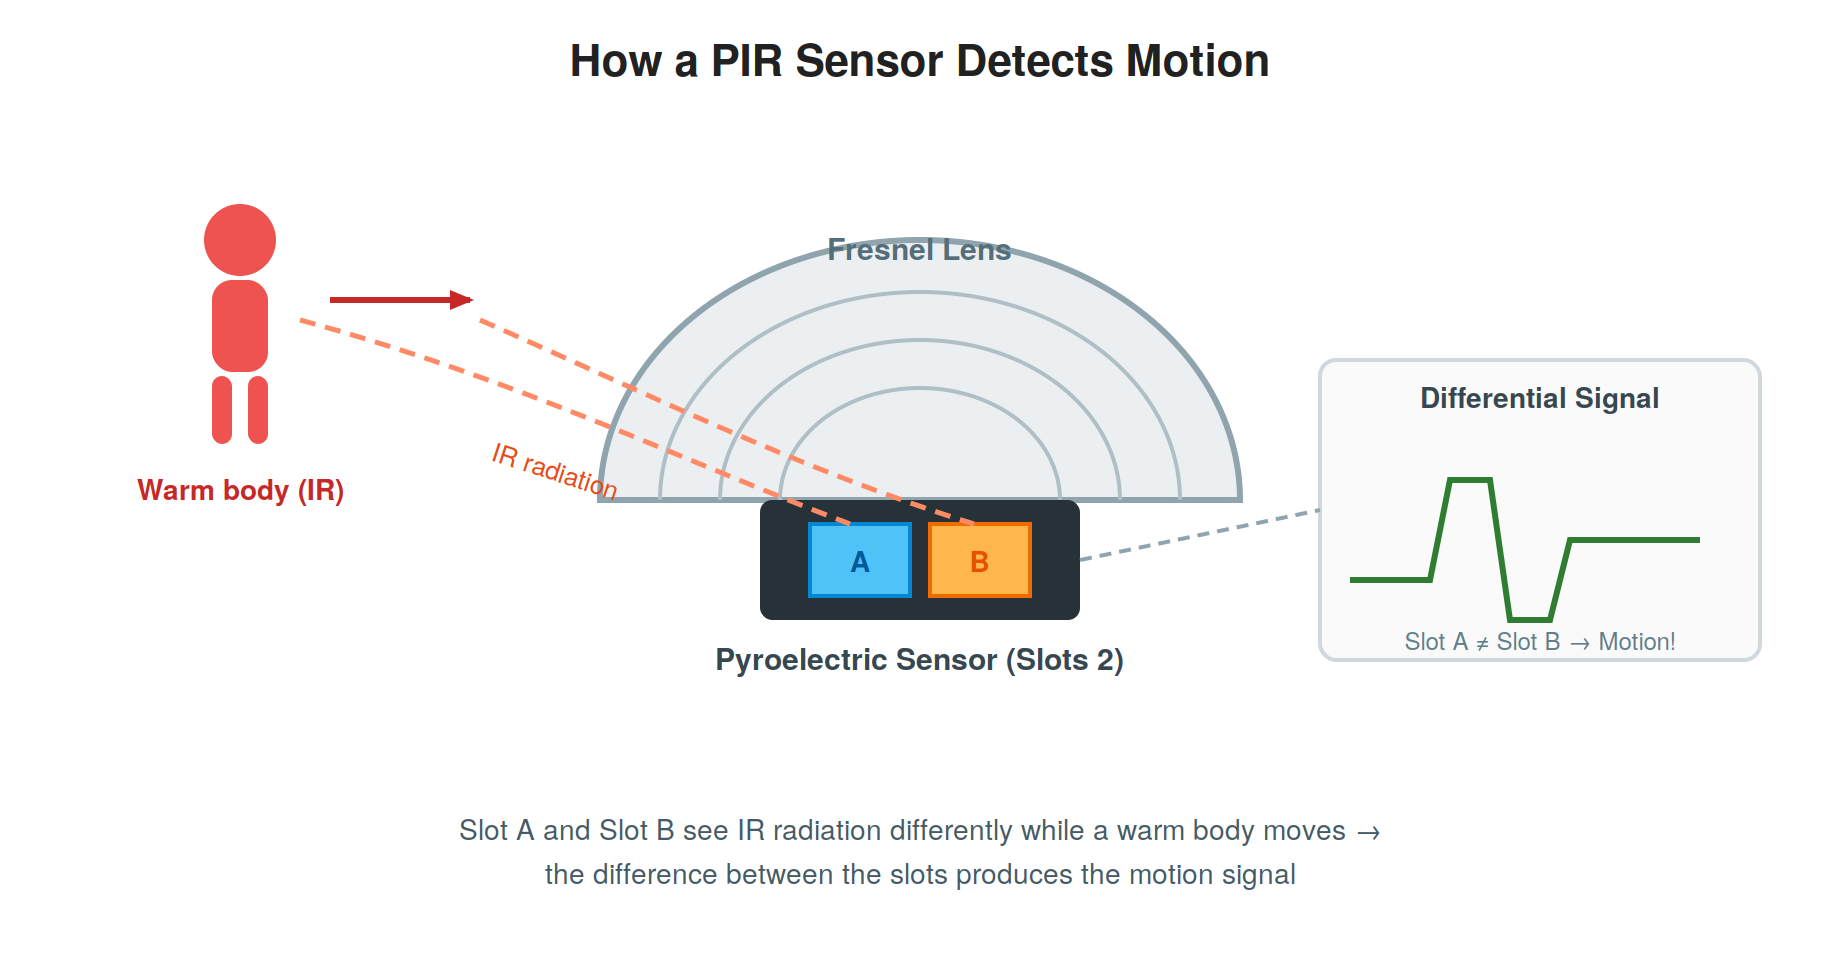
HC-SR501 එකේ හදවත තමයි pyroelectric sensor එක — ඒ metal can එක ඇතුළේ IR-sensitive slots දෙකක් තියෙනවා. මේ slots දෙකම එකම විදිහට IR radiation එකට sensitive යි.
වැඩ කරන logic එක මෙහෙමයි:
- Idle අවස්ථාවේදී — slots දෙකටම වැටෙන්නේ කාමරයේ සාමාන්ය background IR ප්රමාණයම. දෙකේ වෙනස zero නිසා output එකක් නැහැ.
- කෙනෙක් ඉස්සරහින් යනකොට — උණුසුම් සිරුරේ IR එක මුලින්ම එක slot එකකට වැටෙනවා, ටිකකින් අනිත් slot එකට. මේ මොහොතේ slots දෙකේ readings අතර වෙනසක් (differential change) හැදෙනවා.
- ඒ differential signal එක — board එකේ තියෙන BISS0001 IC එකෙන් process කරලා, clean digital HIGH signal එකක් විදිහට OUT pin එකට දෙනවා.
Slots දෙකක් use කරන නිසා කාමරයේ උෂ්ණත්වය හෙමින් වෙනස් වෙන එක (හිරු එළිය වගේ) motion විදිහට වැරදියට detect වෙන්නේ නැහැ — දෙකටම එකසේ බලපාන නිසා cancel වෙනවා.
2.2 Fresnel Lens එක
Sensor එක උඩින් තියෙන සුදු plastic dome එක තමයි Fresnel lens එක. මේකේ කුඩා lens කොටස් ගොඩක් තියෙනවා — ඒ හැම එකක්ම වටපිටාවේ වෙනස් වෙනස් zones වලින් එන IR radiation එක pyroelectric sensor එක උඩට focus කරනවා. මේ නිසා sensor එකේ detection range එක සහ field of view එක (120° දක්වා) ගොඩක් වැඩි වෙනවා.
3. HC-SR501 Technical Specifications
Board එකේ 3.3V voltage regulator එකක් සහ reverse-polarity protection diode එකකුත් තියෙනවා — ඒ නිසා VCC/GND මාරු වුණොත් module එක පිච්චෙන්නේ නැහැ. Output එක 3.3V වුණත් Arduino UNO එකේ 5V input pins වලට ඒක HIGH විදිහට හොඳටම read වෙනවා.
4. Pinout එක සහ Adjustments
4.1 Potentiometers දෙක
- Sensitivity (Range) Pot එක — Clockwise කැරකුවාම detection range එක වැඩි වෙනවා (7m දක්වා), counterclockwise කැරකුවාම අඩු වෙනවා (3m දක්වා). ළඟ තියෙන දේවල් විතරක් detect කරන්න ඕන නම් අඩු කරන්න.
- Time Delay Pot එක — Motion එකක් detect වුණාට පස්සේ OUT pin එක HIGH වෙලා තියෙන කාලය මේකෙන් set වෙනවා. Clockwise = වැඩි (මිනිත්තු 3 දක්වා), counterclockwise = අඩු (තත්පර 1 දක්වා).
4.2 Trigger Mode Jumper එක (H / L)
Board එකේ කොනක තියෙන jumper එකෙන් trigger mode එක තෝරනවා. මේ දෙකේ වෙනස තේරුම් ගන්න එක වැදගත්:
ගොඩක් Arduino projects වලට H (Repeatable Trigger) mode එක තමයි ගැලපෙන්නේ — කෙනෙක් ඉන්නකම් output එක HIGH වෙලා තියෙන නිසා "occupancy" detect කරන්න ලේසියි.
4.3 RT සහ RL Solder Pads (Optional)
- RT pad එක — Thermistor එකක් solder කළොත් උෂ්ණත්වය අනුව sensor එක compensate වෙනවා (රත් වෙච්ච පරිසරවල accuracy එක වැඩි වෙනවා).
- RL pad එක — LDR (light sensor) එකක් solder කළොත් අඳුරේදී විතරක් trigger වෙන්න හදන්න පුළුවන් — automatic night light වගේ projects වලට.
5. Arduino UNO එකට Wire කිරීම
Wiring එක හරිම simple යි — wires 3යි ඕන වෙන්නේ. Output එක digital signal එකක් නිසා ඕනෑම digital pin එකකට connect කරන්න පුළුවන් — අපි pin 8 use කරමු. LED එකට අපි Arduino board එකේම තියෙන built-in LED එක (pin 13) use කරනවා, ඒ නිසා extra components ඕනෑ නැහැ.
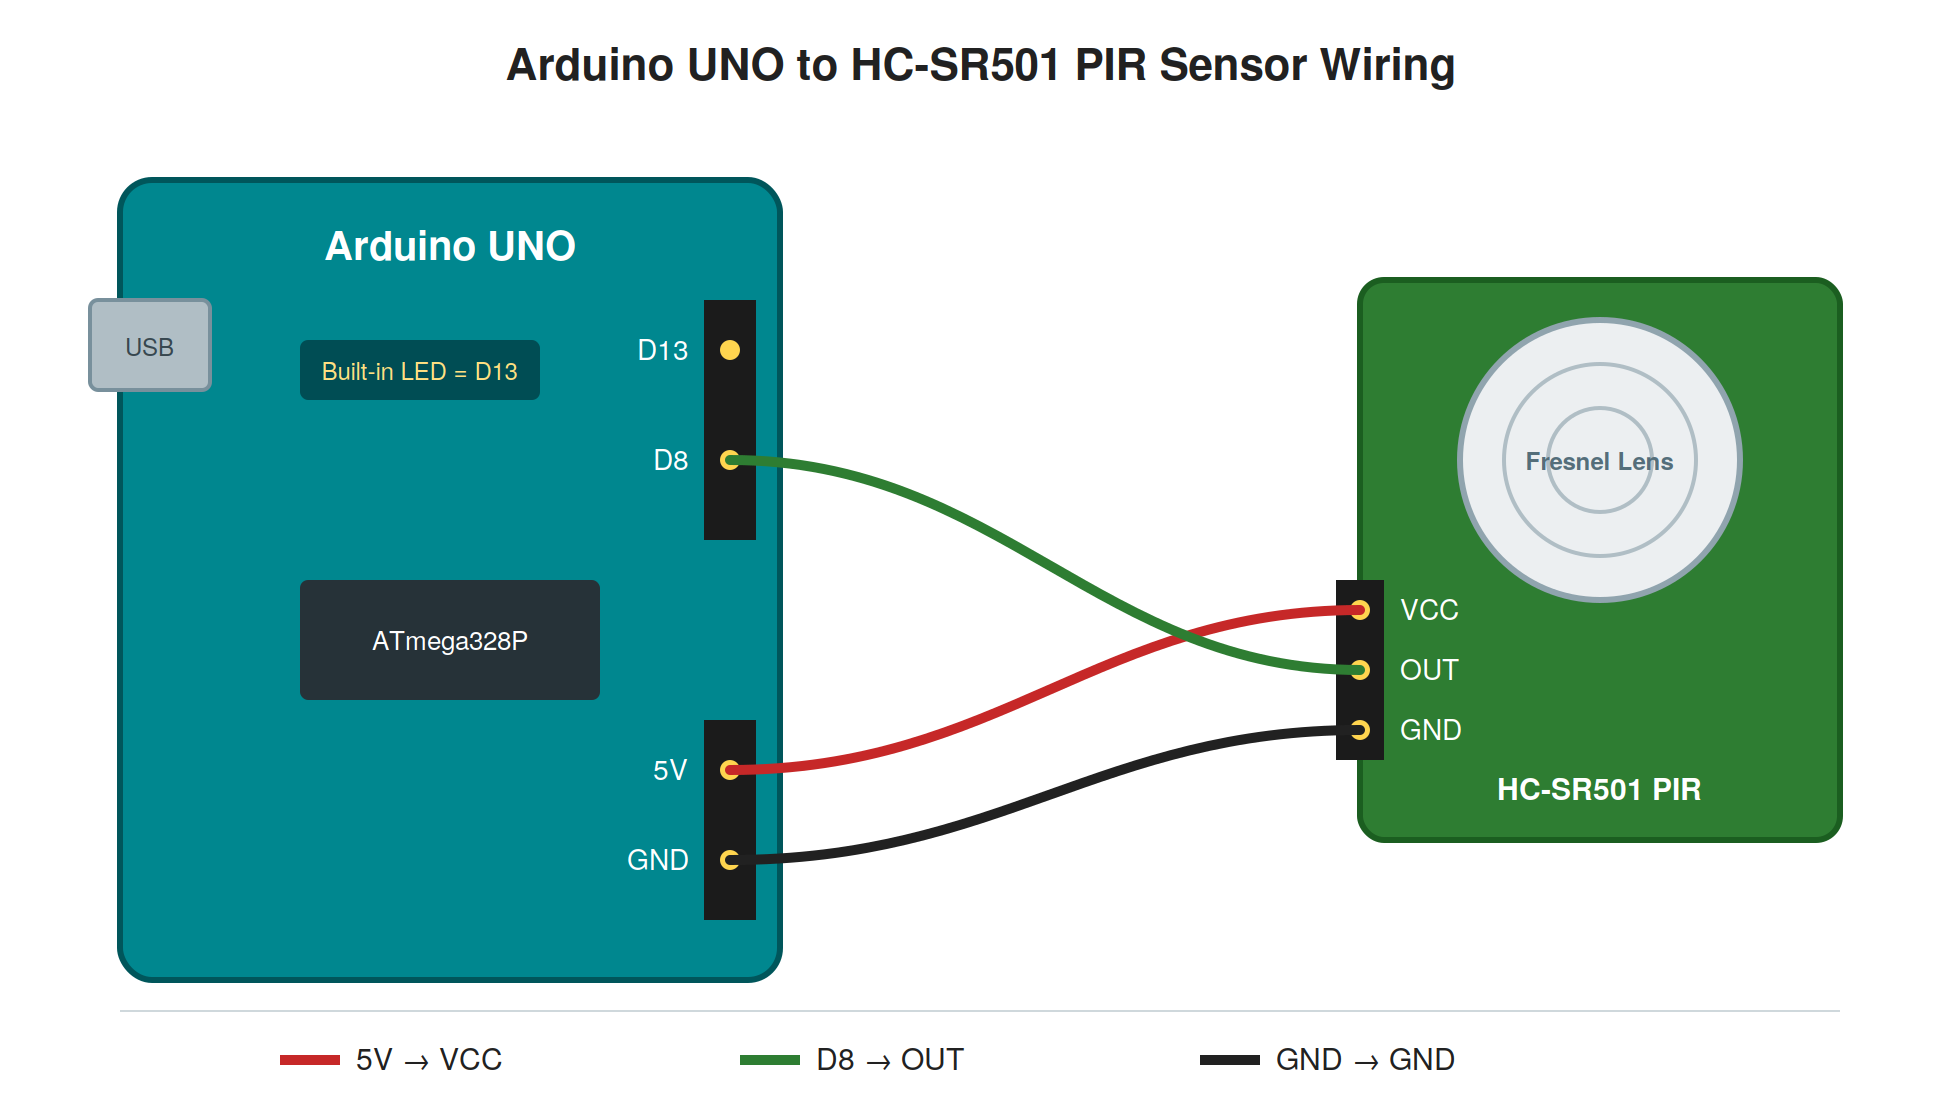
Recommended settings මුලින්ම test කරනකොට: jumper එක H position එකේ, time delay pot එක අඩුම පැත්තට (counterclockwise), sensitivity pot එක මැදට තියන්න.
6. Arduino Code Example එක
මේ sketch එක PIR sensor එකේ output එක නිරන්තරයෙන් කියවලා, motion detect වුණාම built-in LED එක පත්තු කරලා Serial Monitor එකට message එකක් print කරනවා. State change එක (LOW→HIGH සහ HIGH→LOW) විතරක් print කරන නිසා Serial Monitor එක flood වෙන්නේ නැහැ:
const int pirPin = 8;    // PIR OUT pin එක
const int ledPin = 13;   // Built-in LED එක
int pirState = LOW;      // කලින් state එක මතක තියාගන්න
int currentValue = 0;
void setup() {
  pinMode(pirPin, INPUT);
  pinMode(ledPin, OUTPUT);
  Serial.begin(9600);
  Serial.println("PIR sensor warming up...");
  delay(60000); // තත්පර 60 ක් warm-up වෙන්න දෙනවා
  Serial.println("Sensor ready!");
}
void loop() {
  currentValue = digitalRead(pirPin);
  if (currentValue == HIGH) {
    digitalWrite(ledPin, HIGH);  // LED එක ON
    if (pirState == LOW) {
      Serial.println("Motion detected!");
      pirState = HIGH;
    }
  } else {
    digitalWrite(ledPin, LOW);   // LED එක OFF
    if (pirState == HIGH) {
      Serial.println("Motion ended!");
      pirState = LOW;
    }
  }
}
6.1 Code එක තේරුම් ගනිමු
pinMode(pirPin, INPUT) — PIR output එක කියවන්න pin 8 input එකක් විදිහට set කරනවා.
delay(60000) — Setup එකේදී තත්පර 60ක් ඉන්නවා, sensor එක warm-up වෙනකම්. මේක ගැන වැඩි විස්තර පහළින්.
digitalRead(pirPin) — Motion තියෙනවා නම් HIGH, නැත්නම් LOW return වෙනවා. සාමාන්ය digital input එකක් වගේමයි.
pirState variable එක — කලින් loop එකේ state එක මතක තියාගෙන, state එක වෙනස් වුණාම (transition) විතරක් Serial message print කරනවා.6.2 Serial Monitor Output එක
PIR sensor warming up...
Sensor ready!
Motion detected!
Motion ended!
Motion detected!
Motion ended!
7. වැදගත් Practical Tips
- Warm-up Time එක (තත්පර 30–60) — Power දුන්නට පස්සේ sensor එක කාමරයේ background IR pattern එක "ඉගෙන ගන්න" තත්පර 30–60ක් ගන්නවා. මේ කාලය ඇතුළත false triggers එන්න පුළුවන් — ඒ නිසා warm-up එකේදී sensor එක ඉස්සරහ move වෙන්න එපා. Code එකේ delay එක දාලා තියෙන්නේ ඒකයි.
- Lockout / Dead Time එක — Output එක LOW වුණාට පස්සේ තත්පර 2ක් විතර sensor එක අලුත් motion ignore කරනවා. ඉක්මනට දෙපාරක් trigger කරන්න බැරි ඒකයි.
- False triggers අඩු කරන්න — Sensor එක හිරු එළිය කෙලින්ම වැටෙන තැන්, heater/AC vents ළඟ, ජනේල ඉස්සරහ තියන්න එපා. උණුසුම් සුළං හෝ එළිය වෙනස්වීම් motion විදිහට detect වෙන්න පුළුවන්.
- Range එක ගැලපෙන්න set කරන්න — Sensitivity pot එක ඕනවට වඩා වැඩි කළොත් අහල තියෙන කාමරවල movements වලටත් trigger වෙන්න පුළුවන්.
- Pets ඉන්න ගෙදරක — බල්ලෝ පූසෝ වගේ සතුනුත් IR emit කරන නිසා ඒගොල්ලොත් detect වෙනවා. Sensor එක උඩට තියලා angle එක adjust කරලා floor level එක අඩුවෙන් cover වෙන්න හදන්න පුළුවන්.
- වීදුරු හරහා වැඩ කරන්නේ නැහැ — සාමාන්ය වීදුරු IR radiation block කරන නිසා window එකක් පිටිපස්සේ ඉඳන් sensor එක වැඩ කරන්නේ නැහැ.
8. Project Ideas
- Automatic Light — Relay module එකක් එක්ක පාවිච්චි කරලා කවුරුහරි ආවම light එක ON වෙන system එකක්.
- Intruder Alarm — Buzzer එකක් connect කරලා motion ආවම alarm එකක් නාද කරන්න.
- Data Logger — කලින් tutorial එකේ microSD card module එකත් එක්ක combine කරලා, motion events වෙලාවත් එක්ක SD card එකට log කරන්න පුළුවන්!
- Smart Notification — ESP8266/ESP32 board එකක් use කරලා motion detect වුණාම phone එකට notification එකක් යවන්න.
9. සාරාංශය (Summary)
HC-SR501 PIR sensor එක motion detection වලට තියෙන ලාබම සහ ලේසිම විසඳුමයි. මතක තියාගන්න ඕන ප්රධාන කරුණු: sensor එක detect කරන්නේ උණුසුම් සිරුරු වල movement එක (IR pattern change), output එක simple digital HIGH/LOW signal එකක්, pots දෙකෙන් range එකයි delay එකයි adjust වෙනවා, jumper එකෙන් trigger mode එක තෝරනවා (ගොඩක් වෙලාවට H), සහ power දුන්නාම තත්පර 30–60ක් warm-up වෙන්න දෙන්නම ඕන. දැන් ඔයාට motion-activated ඕනම project එකක් හදන්න පුළුවන්!
Reference / මූලාශ්රය:
මේ tutorial එක ලියුවේ පහත මූලාශ්රයේ තොරතුරු පදනම් කරගෙන (රූප සටහන් සහ code examples අලුතින්ම හදපු ඒවා): Last Minute Engineers — How HC-SR501 PIR Sensor Works & Interface It With Arduino