
Arduino සමඟ Pulse Sensor එක භාවිතා කරන හැටි (Heart Rate!)
සම්පූර්ණ Tutorial එක — Wiring, Diagrams, Code Examples සමඟ Sinhala + English Technical Terms
1. හැඳින්වීම (Introduction)
Smartwatch එකක් ඔයාගේ heart rate එක බලන්නේ කොහොමද? — PPG (photoplethysmography) technique එකෙන්: light එකකින් ලේ ගලන විදිහේ වෙනස්කම් කියවනවා. Pulse Sensor එක ඒ technique එකම Arduino projects වලට ගේනවා — ඇඟිල්ල තියලා BPM එක!
මේ tutorial එකේදී: PPG principle එක, wiring (wires 3), PulseSensor Playground library + BPM code.
2. PPG — වැඩ කරන හැටි
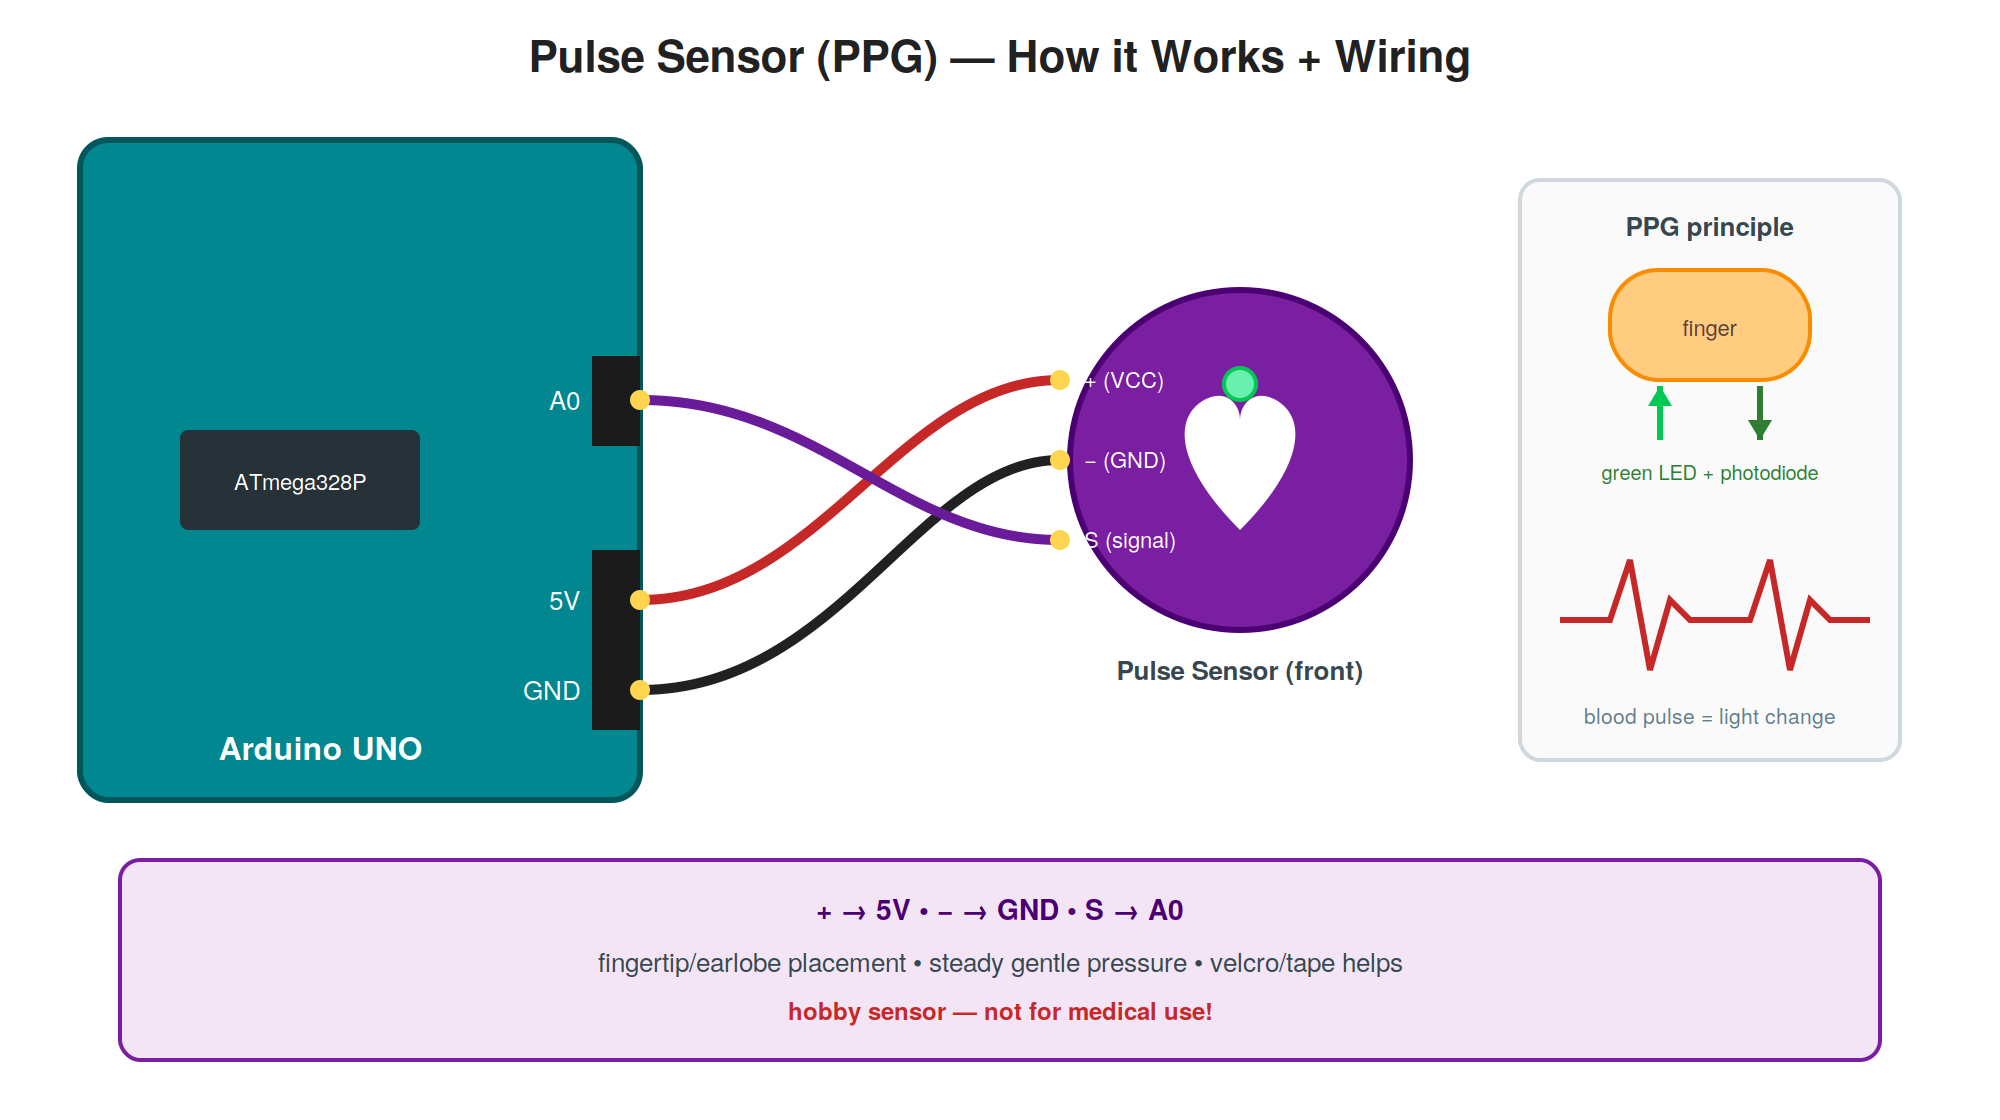
Sensor එකේ green LED (565nm) එකක් + photodiode (APDS-9008) එකක්. LED light එක ඇඟිල්ල ඇතුළට ගිහින් reflect වෙනවා. Heart beat එකකදී ලේ වැඩියෙන් ගලද්දී oxygenated hemoglobin green light වැඩියෙන් absorb කරනවා — reflect වෙන light එක අඩු වෙනවා. ඒ fluctuation එක MCP6001 op-amp එකෙන් amplify + filter කරලා A0 ට analog signal එකක් විදිහට එනවා.
3. Wiring එක
Placement tip: ඇඟිල්ල sensor එක උඩ steady + gentle pressure එකකින් — තද වැඩි = ලේ ගැලීම block, ලිහිල් වැඩි = signal නැහැ. Velcro strap/tape එකකින් fix කරන එක best.
4. Library + Code
Library Manager: "PulseSensor Playground" install කරන්න.
#define USE_ARDUINO_INTERRUPTS true
#include <PulseSensorPlayground.h>
const int PULSE_PIN = 0;     // A0
const int LED_PIN   = 13;    // beat blink
const int THRESHOLD = 550;   // beat detect level
PulseSensorPlayground pulseSensor;
void setup() {
  Serial.begin(9600);
  pulseSensor.analogInput(PULSE_PIN);
  pulseSensor.blinkOnPulse(LED_PIN); // beat = LED blink!
  pulseSensor.setThreshold(THRESHOLD);
  if (pulseSensor.begin()) {
    Serial.println("Pulse sensor ready!");
  }
}
void loop() {
  if (pulseSensor.sawStartOfBeat()) {
    int bpm = pulseSensor.getBeatsPerMinute();
    Serial.print("Beat!  BPM: ");
    Serial.println(bpm);
  }
  delay(20);
}
setThreshold(550) — Signal peak detect level (0–1023). Beats miss නම් අඩු කරන්න, false beats නම් වැඩි කරන්න.
blinkOnPulse(13) — Built-in LED එක ඔයාගේ heart එකත් එක්කම blink — instant feedback!
getBeatsPerMinute() — Beat intervals වලින් ගණනය කරන BPM එක.
5. වැදගත් Tips
- BPM jump/garbage — අත හෙලවෙනවා / pressure වෙනස් වෙනවා. Steady position + strap.
- Ambient light — සූර්ය එළිය/lamp photodiode එකට වැටුණොත් noise — sensor එක cover කරන්න.
- Sensor back insulation — Board back එකේ exposed components — sticker/hot glue thin layer එකකින් insulate කරලා use කරන්න (sweat/skin contact).
- Medical use එපා — Hobby/education only. SpO2 + accuracy ඕන නම් MAX30102 tutorial එක බලන්න.
6. Project Ideas
- BPM Display — TM1637/OLED — heart rate ලොකුවට!
- Heart LED Strip — Beat එකට LED effects — wearable art.
- Workout Logger — MicroSD + DS3231 — exercise session BPM log.
- Stress Meter Demo — Resting BPM trend + buzzer reminder.
7. සාරාංශය (Summary)
Pulse Sensor = green LED + photodiode PPG combo — wires 3යි. මතක තියාගන්න: fingertip steady pressure, threshold 550 tune, PulseSensor Playground library, ambient light block, hobby accuracy only. Biometric projects වලට friendly entry point එක!
Reference / මූලාශ්රය:
මේ tutorial එක ලියුවේ පහත මූලාශ්රයේ තොරතුරු පදනම් කරගෙන (රූප සටහන් සහ code examples අලුතින්ම හදපු ඒවා): Last Minute Engineers — Pulse Sensor with Arduino